Scene Tab

Note:
Depending on the selected projection mode, the interface will display different options.

Floor

You can hide the floor or change its color.

Camera

[Perspective]

The yellow line marks the horizon limit and moves up/down based on camera settings.
Tweak Y Position, Rotation, FOV to keep the character proportionate across the scene.
Right-drag to test character scaling along the scene.
Prefer a low to medium FOV to reduce edge distortion.
Rotation and FOV adjustments cannot be typed directly. Use the on-screen controls to modify them.

Position
X: changing it is unnecessary for this workflow.
Y: Raising it increases the effective scene scale.
This directly impacts traversal time in 2.5D scenes (paths take longer or shorter accordingly).
Adjust it to keep movement consistent with the environment.
Z: handled automatically by the script (suggested).

Rotation
Higher: character scales less as it moves away. Horizon line rises.
Lower: Horizon line drops.

FOV
Higher: not recommended. Character shrinks more with distance. Horizon line drops.
Lower: Horizon line rises.

Keep FOV and camera distance in sync
It is recommended to keep this enabled, as it preserves the correct relationship between the camera’s FOV and its distance from the scene whenever either value changes.

Important: Scrolling with Background Sprite
A green line appears between the camera and the yellow horizon, marking the sprite’s position.
You cannot move beyond this green line, or the character will pass behind the sprite.
This reduces the usable space to set up the environment.
Raising the camera Y or increasing FOV decreases the gap between the camera and the background sprite.


[Orthographic]

Position
X and Z are unused. Y is auto-calculated.

Rotation
Tiny changes drastically alter scene scale.

Size
Fixed.

Suggested workflow:

  • Draw the main walkable area.
  • Click <View environment from top> in the Option section.
  • Imagine how the walkable area would look from above — square, wide, deep… — and adjust Rotation until the Scene View shape reflects the proportions you have in mind.
  • Switch to Character Settings tab and set character size. The script will scale characters automatically.
  • Right-drag to test character scaling along the scene.

If you later adjust the rotation again, the character’s assigned scale will be preserved.

Character

[Perspective]

[Orthographic]

 * Use Root Motion unchecked *

The following components are automatically loaded:

  • Animator Controller: ‘AnimCtrl25dTK’
  • Character Script (Perspective): ‘CharCtrl25dTKPersp’
  • Character Script (Orthographic): ‘CharCtrl25dTKOrtho’

This mode is suitable for characters that rely on manual movement controlled via NavMeshAgent.

 – Character Speed Settings
Depending on the camera projection, speed settings vary.

[Perspective Projection]

  • [Closest Walk Speed / Closest Run Speed]
    Controls the character’s movement speed.

[Orthographic Projection]

  • [Closest Walk Speed / Closest Run Speed]
    Speed when the character is close to the camera (foreground).
  • [Farthest Walk Speed / Farthest Run Speed]
    Speed when the character is far from the camera (background).
    Used for perspective-like interpolation and scale simulation.

(Shared)

[Pivot reference]
Character pivot position.

[Stopping Distance]
Defines how close the character must get to the destination to stop.

[Walk / Run Rotation Speed]
Controls how fast the character rotates to face the target direction.

[Angular speed]
Controls how quickly the character turns to follow curved paths.

[Acceleration]
Controls how quickly the character reaches the desired movement speed when starting to walk or run.

[Update position/rotation on save]
All changes made in Play Mode can be saved as desired, but character position and rotation will be ignored if the boxes are not checked.

 * Use Root Motion checked *

The following components are automatically loaded:

  • Animator Controller: ‘AnimBlendTree’
  • Character Script (Perspective): ‘CharBlendTree’
  • Character Script (Orthographic): ‘CharBlendTreeOrtho’

Use this mode only if your character uses a BlendTree setup with Root Motion enabled in its animations.

[Pivot reference]
Character pivot position.

[Stopping Distance]
Defines how close the character must get to the destination to stop.
In Root Motion mode, a stopping distance value too close to zero may prevent the character from stopping correctly.
Please test low value carefully at different points in the scene.

[Walk Speed / Run Speed]
Default values (0.5 and 1.0) are suitable for standard humanoid characters, but should be adjusted if your animations are faster or slower.

[Run to Walk offset]
Distance before the destination where the character switches from running to walking.
Ensures a smoother stop in Root Motion mode, avoiding abrupt transitions from run directly to idle.

[Turn speed adjust]
Controls how fast the character rotates when changing direction.

Character depth scaling

Available only in Perspective Projection

Not supported in multi-level environments

In Perspective projection, Forced Scaling should be used only after the camera has been correctly calibrated so that the character’s movement speed and the distance covered remain consistent with the environment.

If, even with a properly configured camera, the character appears visually out of scale at different depths of the scene (for example looking too small or too tall compared to the background), this tool allows you to define the scale at the nearest and farthest reference points, ensuring a consistent visual size across the entire scene.

To set the character scale, follow these steps:

  1. Choose two reference points in the scene (for example, a door or a table).
    It’s best if these points are fairly far apart.
  2. Drag the character (hold the right mouse button) to the first point and set its scale. Then click Save Point.
  3. Move the character to the second point, adjust its scale, and click Save Point again.
  4. Done!

From now on, whenever you drag the character with the right mouse button or enter Play Mode/Build Mode, the character will automatically resize according to the values you set.

Note:

  • Any change to camera parameters requires re-setting the scaling points manually.
  • This tool cannot be used in multi-level environments.

Scrolling settings

[Pan Speed]
Speed of scrolling following the character.

[Speed Multiplier]
Affects centering speed when the character stops

[Free Zone]
Dead zone at screen center. No scrolling until the character leaves it.

Path Searching

Allows clicking outside the NavMesh.
The character moves to the nearest walkable point on the NavMesh.
Fully supports multi-level scenes.

Default Game Resolution

Note:

  • The following options can be edited in VBEngineTK after exporting the scene.
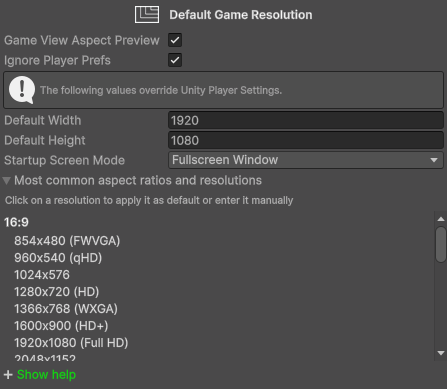
  • Default Width, Default Height, and Startup Screen Mode override Unity’s Player Settings.

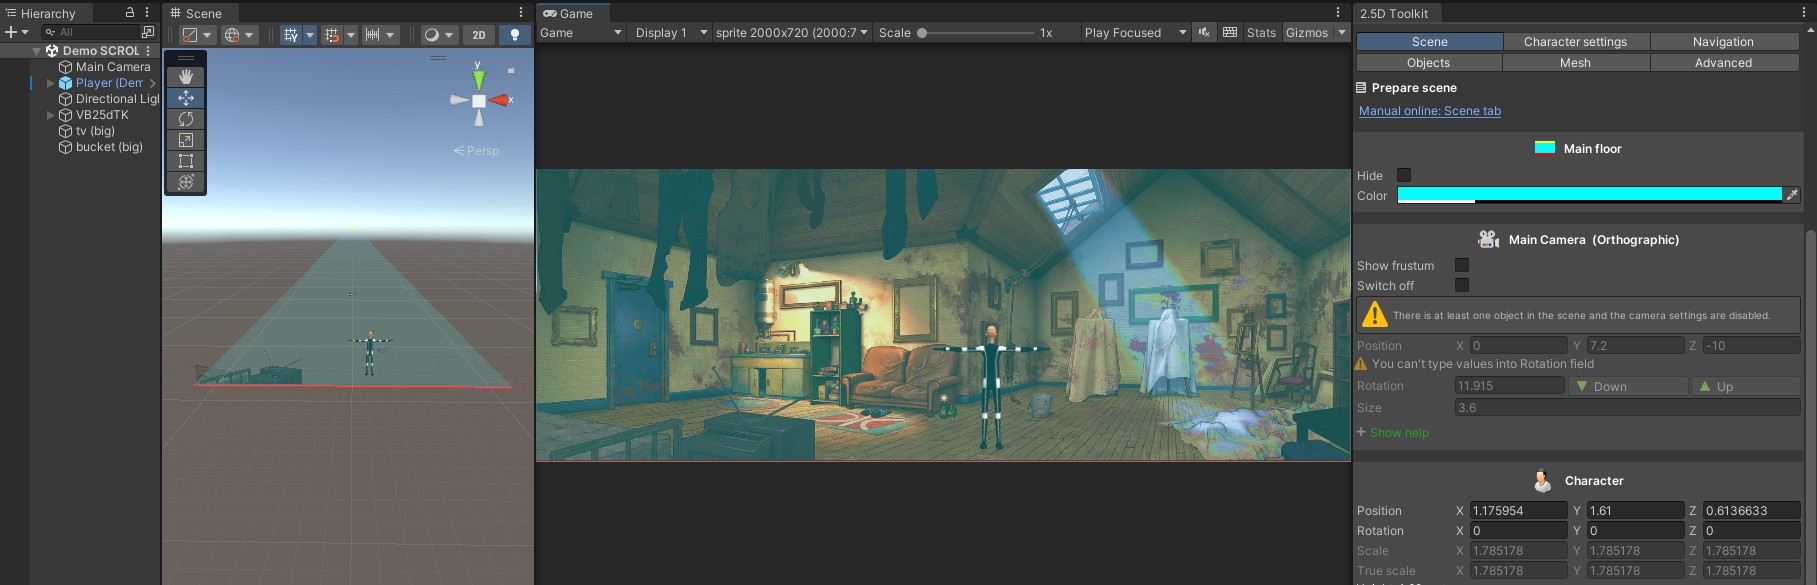
[Game View Aspect Preview]
Only works in Edit Mode.
When enabled, it simulates how the game will appear on monitors with different aspect ratios.
For example, if the Default Resolution is 5120×2160 (21:9):

  • Game View set to 16:9 shows how it appears on 16:9 monitors
  • Game View set to 21:9 shows how it appears on 21:9 monitors

This preview matches what players will see on their screens, including any letterboxing or pillarboxing.

You can temporarily change Default Width/Height to preview different aspect ratios, but remember to restore the intended startup resolution before building your game.

This option is disabled in Play Mode.

[Ignore Player Prefs]
Only works in Build Mode.
When enabled, PlayerPrefs for resolution and screen mode are ignored.
The scene always starts with the settings defined below.

Keep this enabled while developing, but disable it in the final build to allow user choices to persist.

PlayerPrefs are managed internally by VBDataEngineTK and will remember the player’s last chosen resolution and screen mode on the next launch.

[Default Width / Height]
Resolution applied automatically at the first game launch.
Used only if no custom resolution has been set by the player.
After the player selects a new resolution in your game settings, this default is ignored.

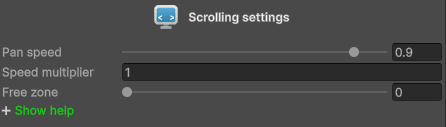
In scrolling scenes:

  • You can support multiple aspect ratios within the same scene.

In scenes using the background camera:

  • The default resolution must belong to the same aspect ratio used when creating the scene.
  • Other aspect ratios will distort the background image and misalign the sprites.

[Startup Screen Mode]
Determines how the game window is created at first launch.
Applied only on the very first run, before any PlayerPrefs override.

Available options:

  • Windowed: resizable window
  • Fullscreen Window: borderless fullscreen matching desktop resolution
  • Exclusive Fullscreen: true fullscreen, may improve performance on some systems
  • Maximized Window: maximizes the window without entering fullscreen

When combined with ‘Ignore Player Prefs’, this mode is enforced on every launch during development.
Disable ‘Ignore Player Prefs’ in the final build to allow the player’s chosen screen mode to persist.

By default, the game starts at 1280×720 (16:9).
If you do not plan to use this aspect ratio in your game, change the default resolution to one that corresponds to your target aspect ratio.

Applied to both Windowed and Fullscreen modes.

The list below shows the most common aspect ratios and resolutions.
Click one of them or type a new value to set it as the startup resolution.

How to test in Play Mode

In Game View, the setup depends on the scene type:

If the scene uses Scrolling:

  • Add presets for all aspect ratios you plan to support and test them in Play Mode.
  • Enter either an aspect ratio or a resolution; any resolution will be interpreted as an aspect ratio.
  • Always use ‘Aspect Ratio’, never ‘Fixed Resolution’.

If the scene uses Background Camera:

  • Only the aspect ratio used when creating the scene is supported.
  • Other ratios will distort the background image and misalign the sprites.
  • If you want to support multiple aspect ratios, create additional scenes with backgrounds adapted to each ratio.

Note:
Always use the ‘Aspect Ratio’ option when entering a new aspect ratio or resolution. Never ‘Fixed Resolution’.